Is your Tineco not charging when you need it most? You’re not alone. Charging issues are among the most common problems Tineco vacuum and floor cleaner owners face, but the good news is that most of these issues can be fixed at home without professional help.
Whether you own a Tineco FLOOR ONE S5, PURE ONE S11, A11 series, or any other model, this comprehensive guide will walk you through every possible reason why is my Tineco not charging and provide step-by-step solutions to get your device back to full power.
Understanding Your Tineco Charging System
Before diving into troubleshooting, it helps to understand how your Tineco charges. Most cordless Tineco models include a removable lithium-ion battery that connects to either a charging dock or plugs directly into a wall adapter. An LED display typically shows the charging status through colored lights or battery icons.
When everything works correctly, placing your Tineco on its charging base or connecting the adapter should immediately trigger the charging indicator. If nothing happens or the lights blink abnormally, you’re dealing with a charging problem that needs attention.
Common Reasons Why Your Tineco Won’t Charge
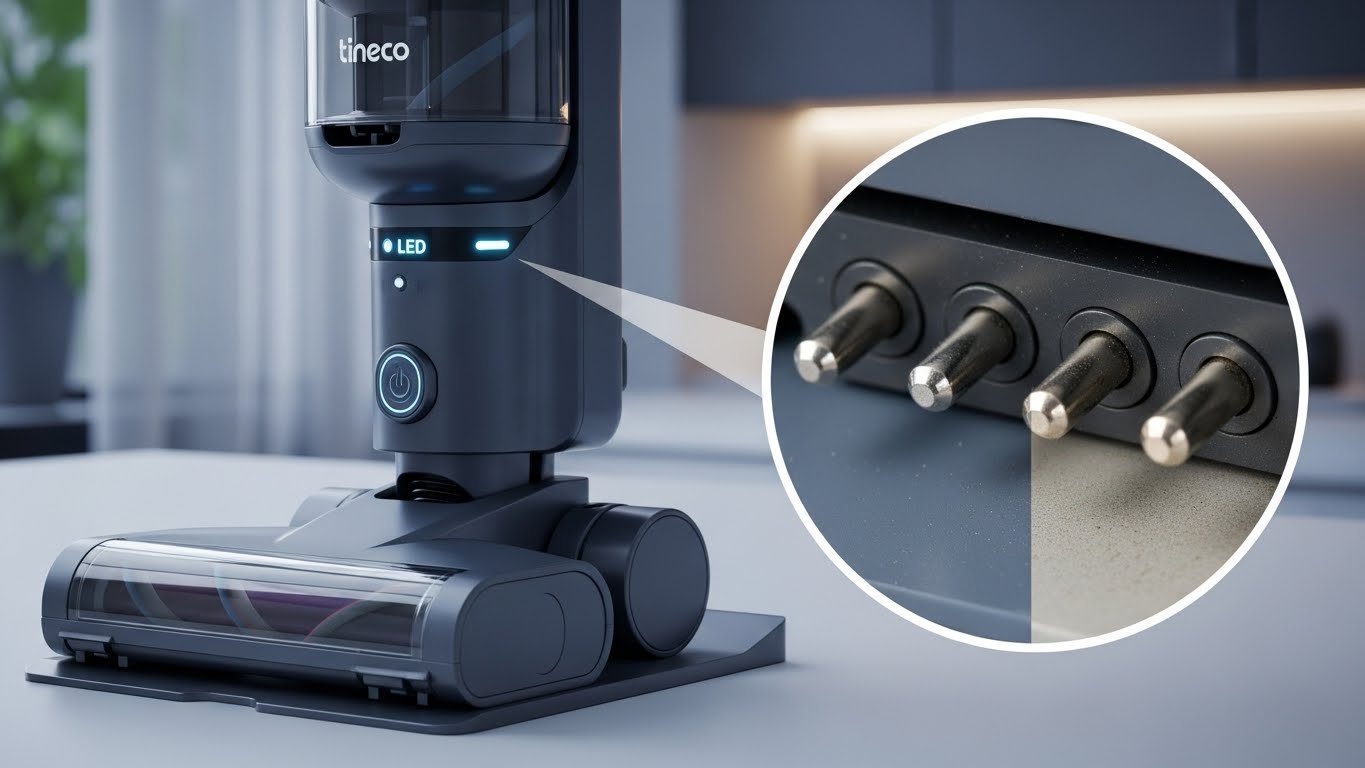
1. Dirty or Corroded Charging Contacts
One of the most frequent culprits behind charging failures is dirty charging contacts. The metal pins on both your Tineco device and the charging dock can accumulate dust, dirt, or oxidation over time. This buildup creates a barrier that prevents proper electrical connection.
When contacts are compromised, your device simply can’t receive power, even though everything else might be working perfectly. This issue is especially common if your Tineco has been sitting unused for weeks or if you regularly clean in dusty environments.
Quick Fix: Take a dry microfiber cloth or cotton swab and gently clean both the charging contacts on your vacuum and the pins on your charging dock. For stubborn buildup, you can use a small amount of rubbing alcohol on the cloth. Make sure everything is completely dry before attempting to charge again.
2. Faulty Power Outlet or Adapter
Sometimes the problem isn’t with your Tineco at all. A malfunctioning wall socket, tripped circuit breaker, or damaged power strip can prevent electricity from reaching your charger. Similarly, if your power adapter has internal damage or a frayed cable, it won’t deliver the necessary current to charge your battery.
Power adapters can fail due to wear and tear, especially if the cable gets frequently bent or pinched. Even a small break in the internal wiring can stop the charging process completely.
Testing Method: Plug another device into the same outlet to verify it’s working. Try your Tineco charger in a different outlet that you know is functioning. If you have access to a multimeter, you can test the adapter’s output voltage. Most Tineco chargers should output between 24-30 volts depending on the model.
3. Battery Overheating Protection
Modern Tineco batteries feature built-in thermal protection systems designed to prevent damage and safety hazards. When your battery gets too hot during extended cleaning sessions or in warm weather, it automatically enters a safety mode and refuses to charge until it cools down.
This protective feature is actually good for battery longevity, but it can be frustrating if you need to charge immediately after use. The battery management system will only allow charging once internal temperatures return to safe levels.
Solution: If your Tineco feels warm to the touch after use, let it rest in a cool, well-ventilated area for 30-60 minutes before attempting to charge. Never try to force charging on a hot battery by placing it near air conditioning vents or in cold environments, as rapid temperature changes can damage the cells.
4. Improperly Seated Battery
For Tineco models with removable batteries, improper installation is a surprisingly common cause of charging failures. If the battery isn’t clicked fully into place or is slightly misaligned, the electrical contacts won’t connect properly.
Even a millimeter of misalignment can prevent your device from recognizing the battery, resulting in no charging response whatsoever. This often happens after battery removal for cleaning or when reinstalling after storage.
Installation Check: Remove your battery completely and inspect both the battery terminals and the device’s battery compartment for any obstructions or damage. Reinstall the battery firmly until you hear or feel a definitive click. Some models have alignment guides or arrows that should match up perfectly.
5. Worn Out or Degraded Battery
Lithium-ion batteries don’t last forever. After several hundred charge cycles, battery capacity naturally degrades. If your Tineco is several years old or has been heavily used, the battery cells may have reached the end of their usable life.
Common signs of battery degradation include rapid power loss during use, inability to hold a full charge, or complete failure to charge. Batteries that have been fully drained and left uncharged for extended periods can also become unrecoverable.
A degraded battery might charge to 100% but only provide a few minutes of runtime, or it might not accept a charge at all. Physical signs include battery swelling, which is a serious safety concern that requires immediate replacement.
Diagnosis: If your Tineco is 2-3 years old and has been used regularly, battery replacement is likely needed. You can test this by checking if the battery holds any charge at all using a multimeter. Readings significantly below the rated voltage indicate degradation. Never continue using a swollen battery.
6. Charging Dock Issues
The charging dock itself can develop problems over time. Loose connections, damaged wiring inside the dock, or misaligned charging pins can all prevent proper charging. If you’ve moved your dock frequently or accidentally dropped it, internal damage may have occurred.
Some users notice their Tineco charges intermittently, working sometimes but not others. This usually indicates a loose connection within the dock that makes contact only when positioned a certain way.
Troubleshooting Steps: Inspect your charging dock carefully for any visible damage, loose parts, or bent pins. Test the dock with a different Tineco battery if you have one available. If the dock has indicator lights, check if they illuminate when plugged in. No lights often mean the dock isn’t receiving power at all.
7. Software Glitches
Newer Tineco models with smart features can experience software-related charging issues. The internal computer that manages battery charging might encounter glitches that prevent normal charging behavior, even when all hardware components are functioning correctly.
These glitches can cause false charging indicators, prevent the charging process from initiating, or stop charging prematurely. The good news is that software issues can usually be resolved with a simple reset.
Reset Procedure: Remove your Tineco from the charging base. Press and hold the power button for 10-15 seconds, even if the device appears completely off. Wait 30 seconds, then place it back on the charger. This forces a system reboot that often clears temporary software errors.
Step-by-Step Troubleshooting Process
Step 1: Perform Visual Inspection
Start with a thorough visual examination of your entire charging setup. Look for obvious issues like damaged cables, cracked charging docks, or visible debris in the charging contacts. Check the power adapter for any signs of physical damage, including cracks in the casing or exposed wires.
Examine the LED indicators on your device. Different blinking patterns communicate specific problems. A red blinking light often indicates battery issues or improper connection, while a green blinking light typically means charging is in progress.
Step 2: Clean All Charging Components
Use a clean, dry cloth to wipe down the metal charging contacts on both your Tineco and the charging dock. Pay special attention to any visible discoloration or buildup. For stubborn residue, lightly dampen the cloth with isopropyl alcohol and wipe again.
Don’t forget to clean the area around the charging port and any connection points. Dust and debris can interfere with charging even if they’re not directly on the contacts. Allow everything to air dry completely before proceeding.
Step 3: Test Different Power Sources
Unplug your charging dock from its current outlet and try a different wall socket that you know is working. Avoid using power strips or extension cords for this test, as they can sometimes cause power delivery issues.
If possible, try charging directly from the wall adapter to the device, bypassing the dock entirely. Some Tineco models support both charging methods, and this test helps isolate whether the dock or the device is the problem.
Step 4: Check Battery Installation
For models with removable batteries, take out the battery and inspect it carefully. Look for any signs of damage, swelling, or corrosion on the terminals. Reinstall the battery, making sure it seats fully and locks into place.
If your Tineco has multiple batteries, try swapping them to determine if one specific battery is faulty. A working battery will charge normally, helping you identify if the problem is battery-specific or system-wide.
Step 5: Allow Cooling Period
If you’ve just finished using your Tineco, give it adequate time to cool down. Touch the battery area gently to check temperature. If it feels warm or hot, wait at least 45-60 minutes before attempting to charge.
Place the device in a room-temperature environment with good air circulation. Avoid extreme temperatures in either direction, as both excessive heat and cold can interfere with charging.
Step 6: Perform System Reset
Execute a full system reset by holding the power button for 10-15 seconds while the device is off the charger. This clears any temporary software glitches that might be preventing charging.
After the reset, wait 30 seconds before placing the device back on the charger. Watch for any charging indicators that should appear within the first few seconds.
Step 7: Extended Charging Test
If your battery has been completely depleted or left uncharged for months, it might need an extended charging period to recover. Place the device on the charger and leave it for 3-4 hours, even if you don’t see immediate charging indicators.
Deeply discharged batteries sometimes take time to register with the charging system. The internal safety circuits need time to stabilize before normal charging can begin. However, if you see no response after 4 hours, the battery may be beyond recovery.
Model-Specific Charging Issues
1. Tineco FLOOR ONE Series Problems
The FLOOR ONE S3, S5, and S7 PRO models can experience unique charging issues related to their wet-dry cleaning system. Water damage to charging contacts is more common with these models due to their exposure to moisture during use.
Always ensure the charging area is completely dry before docking. Check the gaskets and seals around the battery compartment for wear or damage that might allow water intrusion. If moisture gets into the charging circuit, it can cause corrosion and charging failures.
2. Tineco PURE ONE Series Troubles
PURE ONE stick vacuums often face charging problems when the battery is incorrectly installed after cleaning. The battery alignment is critical in these models, and even slight misalignment prevents charging.
Some PURE ONE owners report charging issues after firmware updates. If your model connects to the Tineco app, check for software updates that might resolve known charging bugs.
3. Tineco A11 Series Challenges
The A11 series is particularly prone to battery degradation issues. Users commonly report that batteries lose charging capability after 12-18 months of regular use. Multiple batteries failing simultaneously often indicates a charger problem rather than battery issues.
Test each A11 battery individually in a working charging station to identify which components are faulty. Replacement batteries are readily available, but ensure you purchase genuine Tineco batteries to avoid compatibility problems.
When to Replace Your Tineco Battery
Battery replacement becomes necessary when troubleshooting fails to restore charging functionality. Here are clear signs that your battery needs replacement rather than repair:
Definitive Replacement Indicators:
- Battery is more than 2-3 years old with regular use
- Visible swelling or deformation of the battery pack
- Battery gets extremely hot during normal use
- Runtime has decreased to less than 25% of original capacity
- Complete failure to accept charge after all troubleshooting steps
- Multimeter readings show voltage significantly below specification
- Physical damage to battery casing or terminals
Always purchase genuine Tineco replacement batteries from authorized retailers. Third-party batteries might be cheaper but can cause compatibility issues, void warranties, and pose safety risks.
Preventing Future Charging Problems
1. Proper Battery Maintenance
Store your Tineco with batteries at 40-60% charge if you won’t use it for extended periods. Fully draining or completely charging batteries before long-term storage accelerates degradation.
Charge your Tineco in moderate temperatures between 50-90°F (10-32°C). Extreme heat or cold can permanently damage battery cells and reduce overall lifespan.
2. Regular Cleaning Schedule
Establish a monthly routine of cleaning all charging contacts, even if charging seems normal. Prevention is much easier than dealing with corrosion or buildup that has accumulated over months.
Wipe down the charging dock and device contacts after particularly dusty cleaning sessions. Keep the charging area clean and dry at all times.
3. Optimal Charging Practices
Avoid leaving your Tineco on the charger continuously for days or weeks at a time. While modern batteries have overcharge protection, perpetual charging can generate heat that gradually degrades battery health.
For best battery longevity, charge your device after each use but unplug the charger once it reaches 100%. If you use your Tineco daily, aim to keep the battery between 20-80% charge for most of its life.
4. Environmental Considerations
Position your charging dock in a cool, dry location away from direct sunlight, heating vents, or humid areas like bathrooms. Temperature extremes accelerate battery aging.
Ensure proper ventilation around the charging area. Adequate airflow helps dissipate heat during charging, which protects both the battery and charging electronics.
Understanding LED Indicator Meanings
Tineco models use LED indicators to communicate charging status and problems. Understanding these signals helps diagnose issues quickly:
Common LED Patterns:
- Solid red light: Usually indicates charging in progress for low battery
- Solid green light: Fully charged or charging complete
- Blinking red light: Battery error, improper connection, or overheating
- Blinking green light: Charging in progress from moderate battery level
- No lights: No power to dock, dead battery, or complete system failure
Consult your specific model’s manual for precise LED meanings, as patterns vary between different Tineco products. The manual provides model-specific diagnostic information that generic guides can’t cover.
Advanced Troubleshooting for Persistent Issues
1. Cross-Function Testing
If you have access to another Tineco device or spare parts, perform cross-function testing. Try your battery in a working charging station or test a known-good battery in your dock. This process isolates the exact faulty component.
Swap adapters between devices if possible. A working adapter should charge any compatible Tineco model. If your adapter won’t charge any device, it’s definitely defective.
2. Voltage Testing with Multimeter
For technically inclined users, a multimeter can provide definitive answers. Test the power adapter’s output voltage, which should match specifications (typically 24-30V for most models). Test battery voltage at the terminals, comparing readings to specifications in your manual.
Low voltage readings from a “fully charged” battery indicate cell degradation. No voltage reading usually means complete battery failure.
3. Factory Reset Procedure
Some advanced Tineco models allow factory resets that clear all settings and software configurations. This process is more comprehensive than a simple power button reset.
The factory reset procedure varies by model but typically involves holding specific button combinations while powering on. Check your user manual or contact Tineco support for model-specific reset instructions.
When to Contact Tineco Support
After exhausting all troubleshooting steps, professional assistance may be necessary. Contact Tineco support if:
- Your device is still under warranty (typically 1-2 years)
- You’ve completed all troubleshooting with no success
- You notice safety issues like smoking, unusual smells, or excessive heat
- Multiple components seem to be failing simultaneously
- Physical damage has occurred that you cannot repair
Tineco’s customer support can diagnose deeper issues, provide warranty replacements, or direct you to authorized repair centers. Have your model number, serial number, and purchase date ready when contacting support.
Cost Considerations for Repairs
Understanding repair costs helps you make informed decisions about fixing versus replacing your Tineco:
Typical Repair Costs:
- Replacement battery: $50-120 depending on model
- New charging dock: $30-60
- Power adapter: $20-40
- Professional service: $80-150 for diagnosis and repair
Compare these costs against the price of a new Tineco. If repair costs exceed 60% of a new device’s price and your unit is several years old, replacement might be more economical.
Alternative Solutions While Troubleshooting
If your Tineco remains non-functional while you wait for parts or repairs:
Check if you have backup batteries. Many users purchase spare batteries for extended cleaning sessions, which can serve as temporary replacements.
Contact friends or neighbors who might have compatible Tineco models. Borrowing a charger or battery for testing purposes can quickly identify your specific problem without purchasing new parts.
Consider renting a cleaner for urgent needs. The rental cost might be justified while you resolve your Tineco’s charging issues properly.
Long-Term Battery Health Tips
Maximize your Tineco battery’s lifespan with these proven strategies:
Never let the battery completely drain to 0% regularly. Lithium-ion batteries last longer when kept between 20-80% charge for daily use.
Avoid charging immediately after intensive use in hot conditions. Let the device and battery cool naturally for 30 minutes before connecting to the charger.
Store unused batteries properly. If you have multiple batteries, rotate their use to prevent one from sitting idle for months. Store at room temperature with approximately 50% charge.
Update firmware when available. Tineco occasionally releases updates that improve battery management and charging algorithms. Connect your device to the Tineco app regularly to check for updates.
Understanding Warranty Coverage
Most Tineco devices come with a 1-2 year limited warranty covering manufacturing defects. Understanding warranty terms helps you leverage this protection:
Charging-related failures caused by manufacturing defects are typically covered. However, normal battery degradation over time is considered expected wear and usually isn’t covered after the first year.
Physical damage, water damage (except for designed wet-dry models), or damage from unauthorized repairs voids most warranties. Always contact Tineco before attempting internal repairs on warranty-covered devices.
Keep your purchase receipt and register your product on Tineco’s website. Registered products often receive extended support and faster warranty claim processing.
Conclusion
Figuring out why is my Tineco not charging can be frustrating, but most issues have straightforward solutions. Start with the simple fixes like cleaning contacts and checking power sources before moving to more complex troubleshooting.
Remember that battery-powered devices require proper care and maintenance to perform reliably. Regular cleaning, appropriate charging practices, and attention to environmental factors will prevent most charging problems before they occur.
When DIY troubleshooting doesn’t resolve your issue, don’t hesitate to contact Tineco support or consider professional repair services. With proper care and timely intervention, your Tineco can provide years of reliable cleaning performance.
Frequently Asked Questions
How long should it take for my Tineco to fully charge?
Most Tineco models require 3-4 hours to fully charge from empty. FLOOR ONE series typically takes 3-3.5 hours, while PURE ONE stick vacuums need 3.5-4 hours. If charging takes significantly longer or never completes, this indicates a problem with the battery, charger, or charging circuit.
Can I use my Tineco while it’s charging?
No, Tineco devices cannot be used while charging. The battery must be installed and docked or connected to the charger for the charging process to occur. This design prevents damage to charging components and ensures safe operation.
Why does my Tineco charge to 100% but only run for a few minutes?
This symptom indicates battery degradation. The battery management system reports 100% based on the reduced capacity of worn cells, but the actual energy storage is significantly diminished. Battery replacement is the only solution for this issue.
Is it normal for my Tineco battery to get warm during charging?
Slight warmth during charging is normal as chemical reactions generate heat. However, if the battery becomes hot to the touch or you notice unusual smells, disconnect immediately and contact Tineco support. Excessive heat indicates a potential safety issue that requires professional attention.